Pipelines
Creating deployment pipelines with GreenOps is a very straightforward process.
Using the UI to Create a Pipeline Manifest
Use the UI builder in the Manifests > Create Pipeline Manifest section.
Adding Steps in a Pipeline
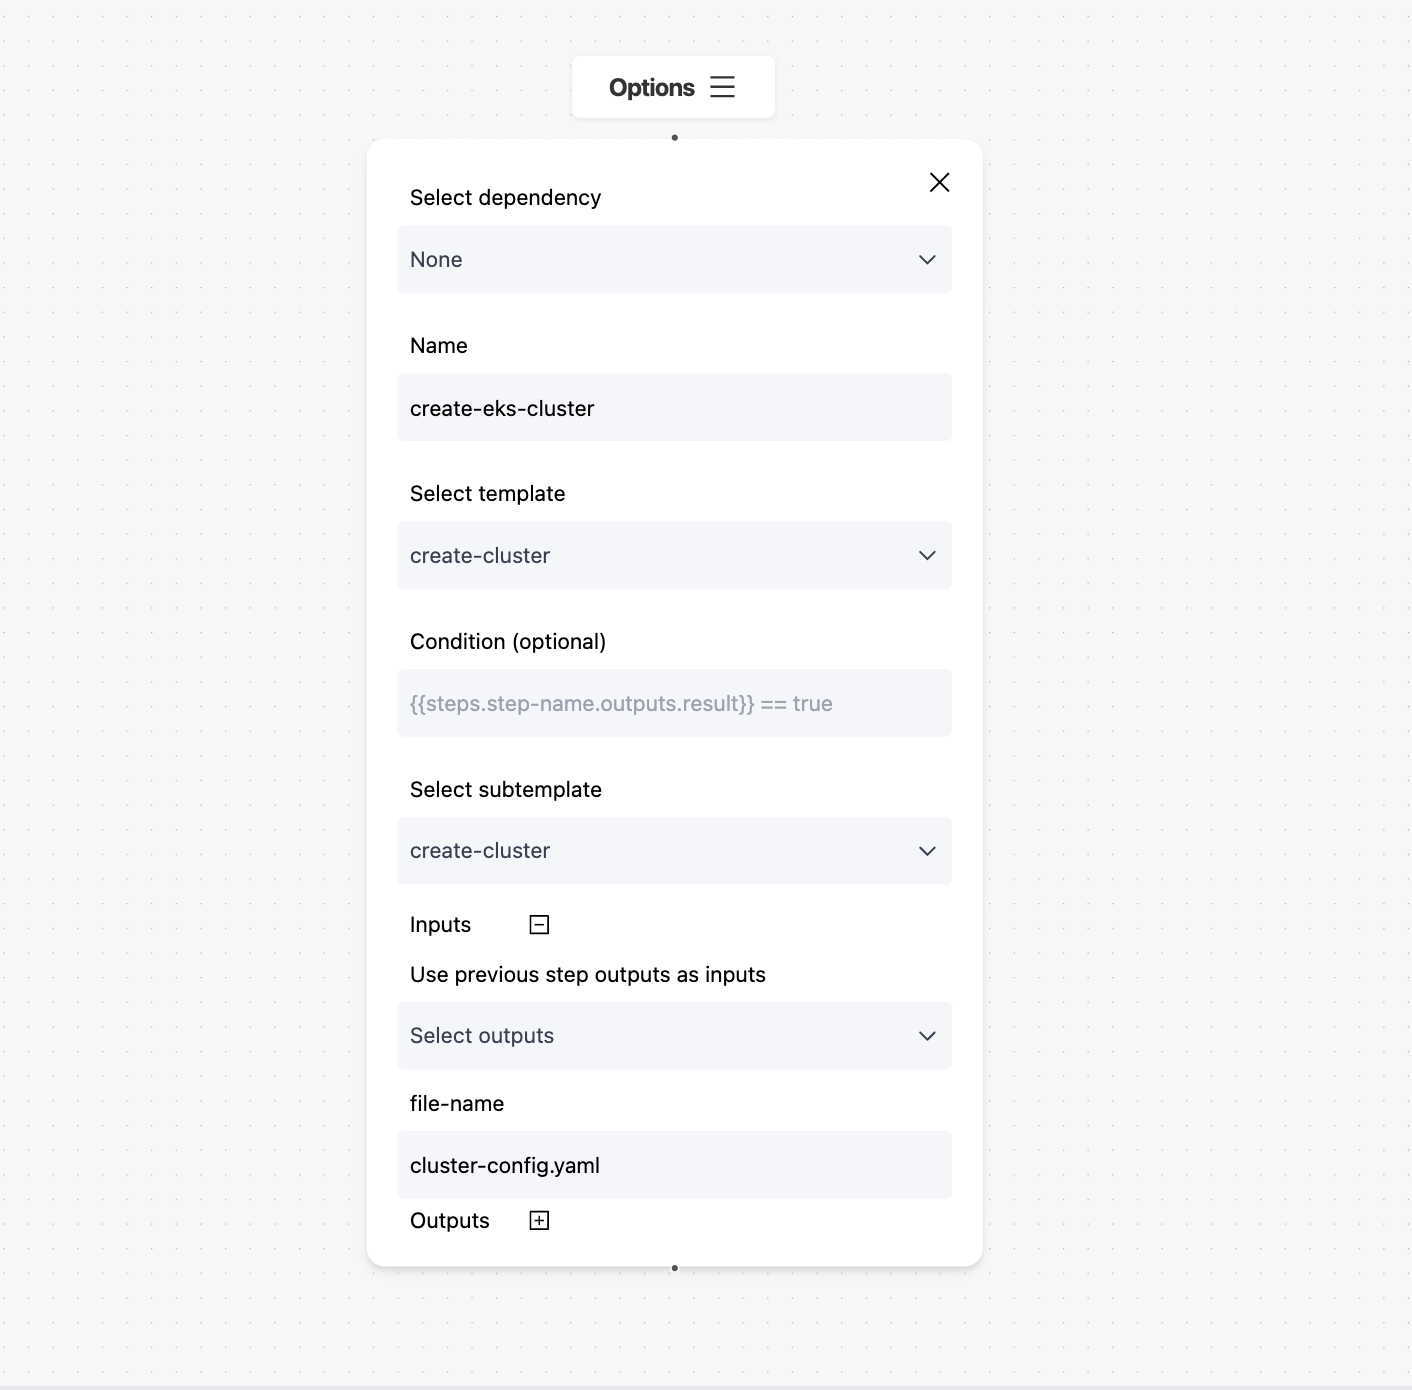
Use the Add Step button to add a new step in a workflow. Each step will refer to a template, whether that is a Docker image build or an Argo CD sync.
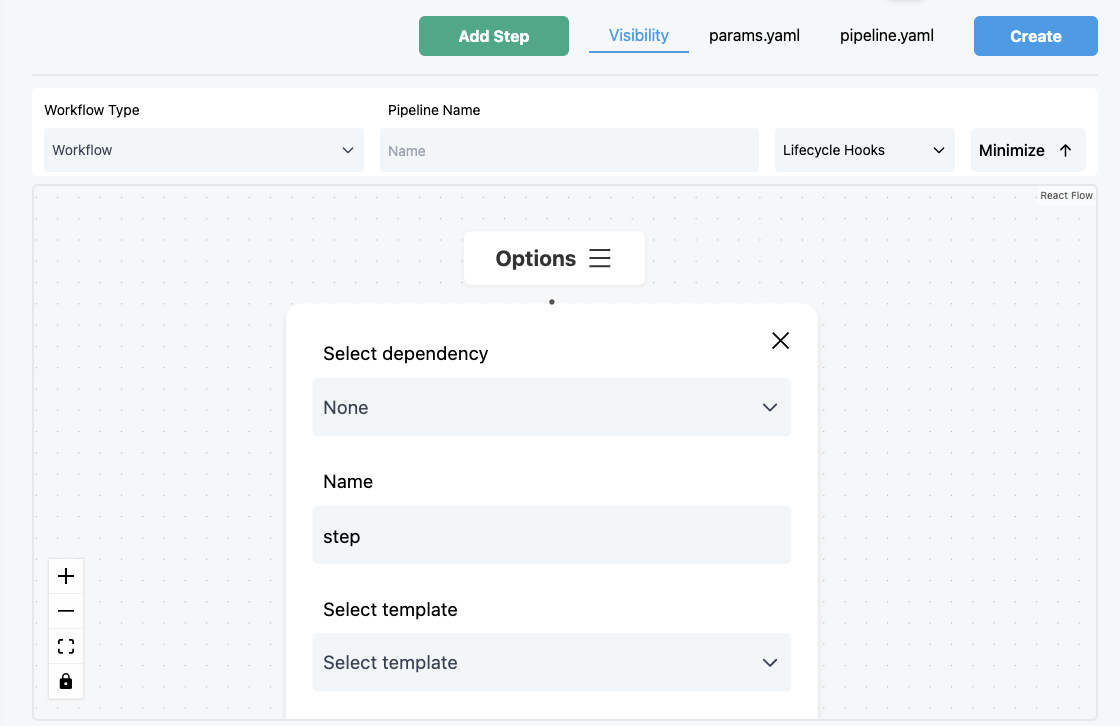
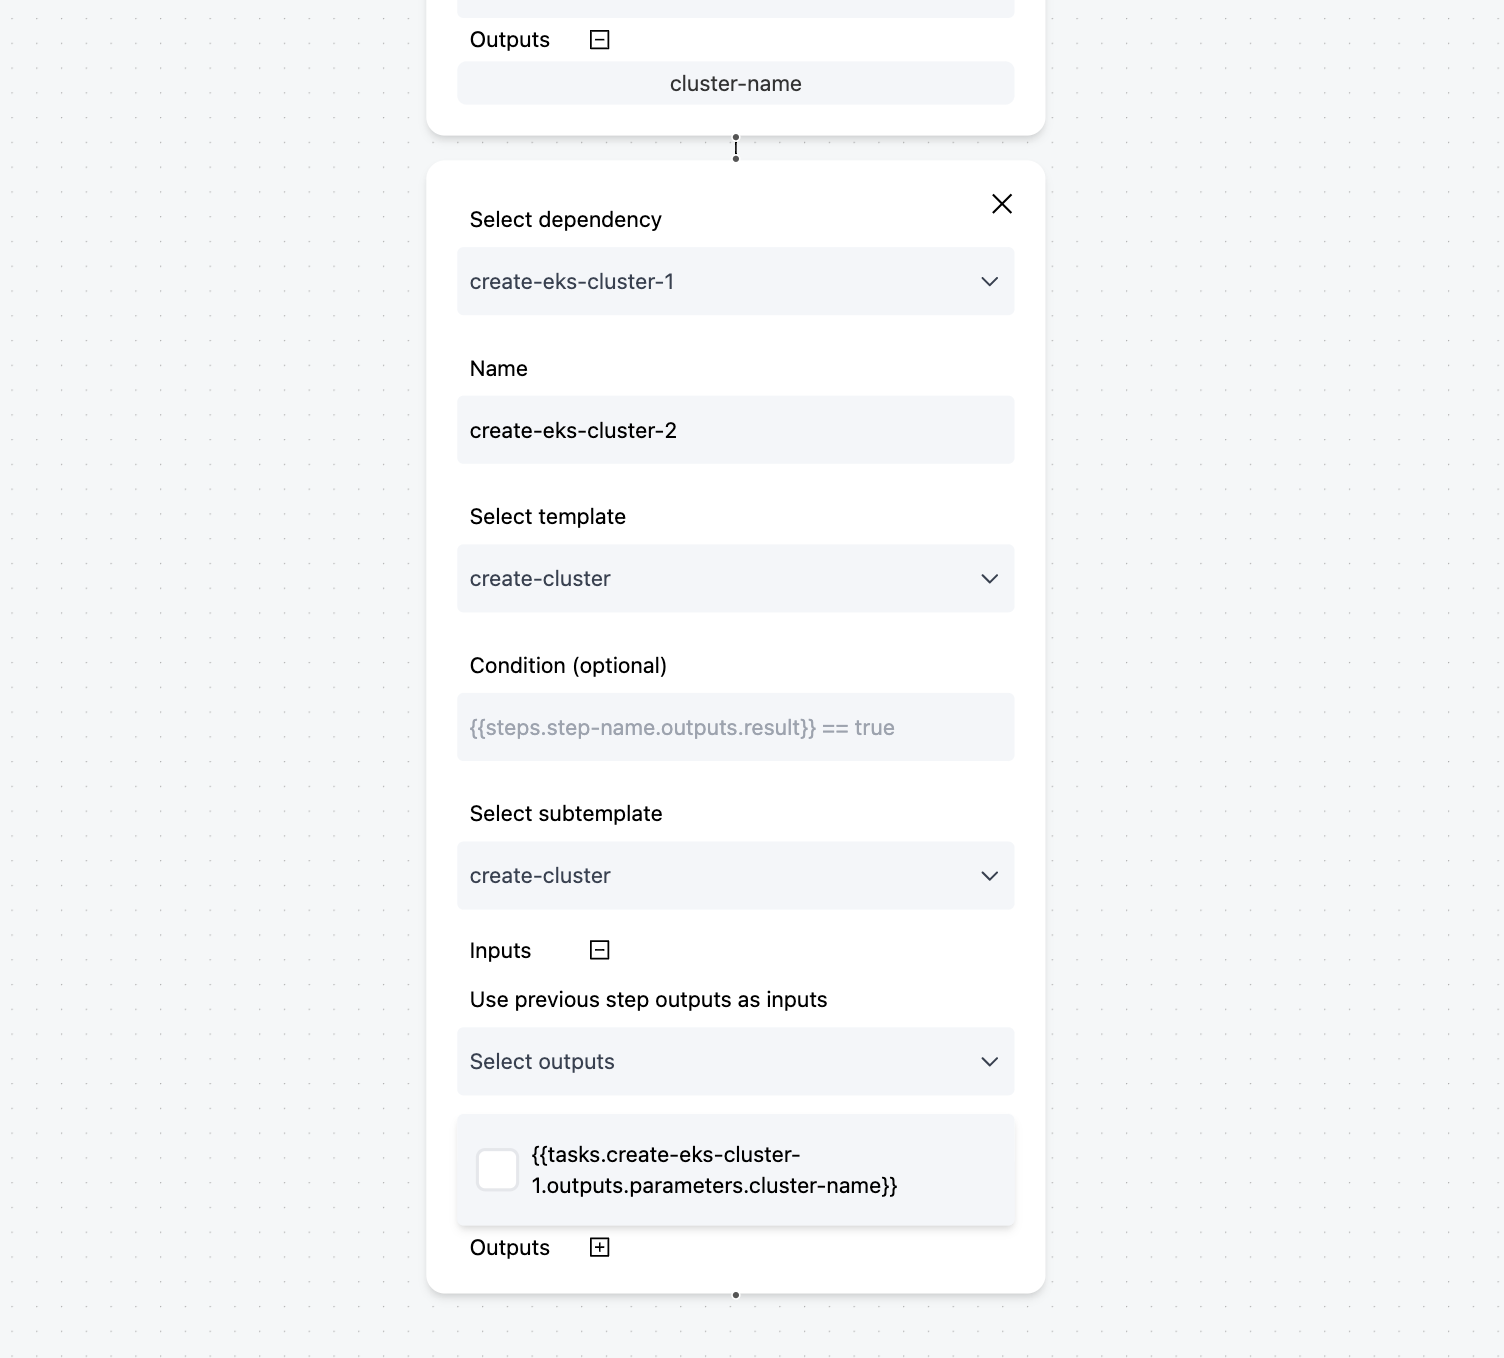
Stack these steps like Lego blocks to build your complete pipelines. Using the Select dependency section in the steps, users can add ordering and create linear workflows, or more complex workflows with parallel execution and multiple dependencies.
Inputs
In a template, variables are used to represent dynamic values that might change from workflow to workflow. The pipeline manifest page is where users can define these values. By pressing the + button, users can expand the Inputs section and see what variables each step expects. Use custom strings to specify the input values.
Passing Variables Between Steps
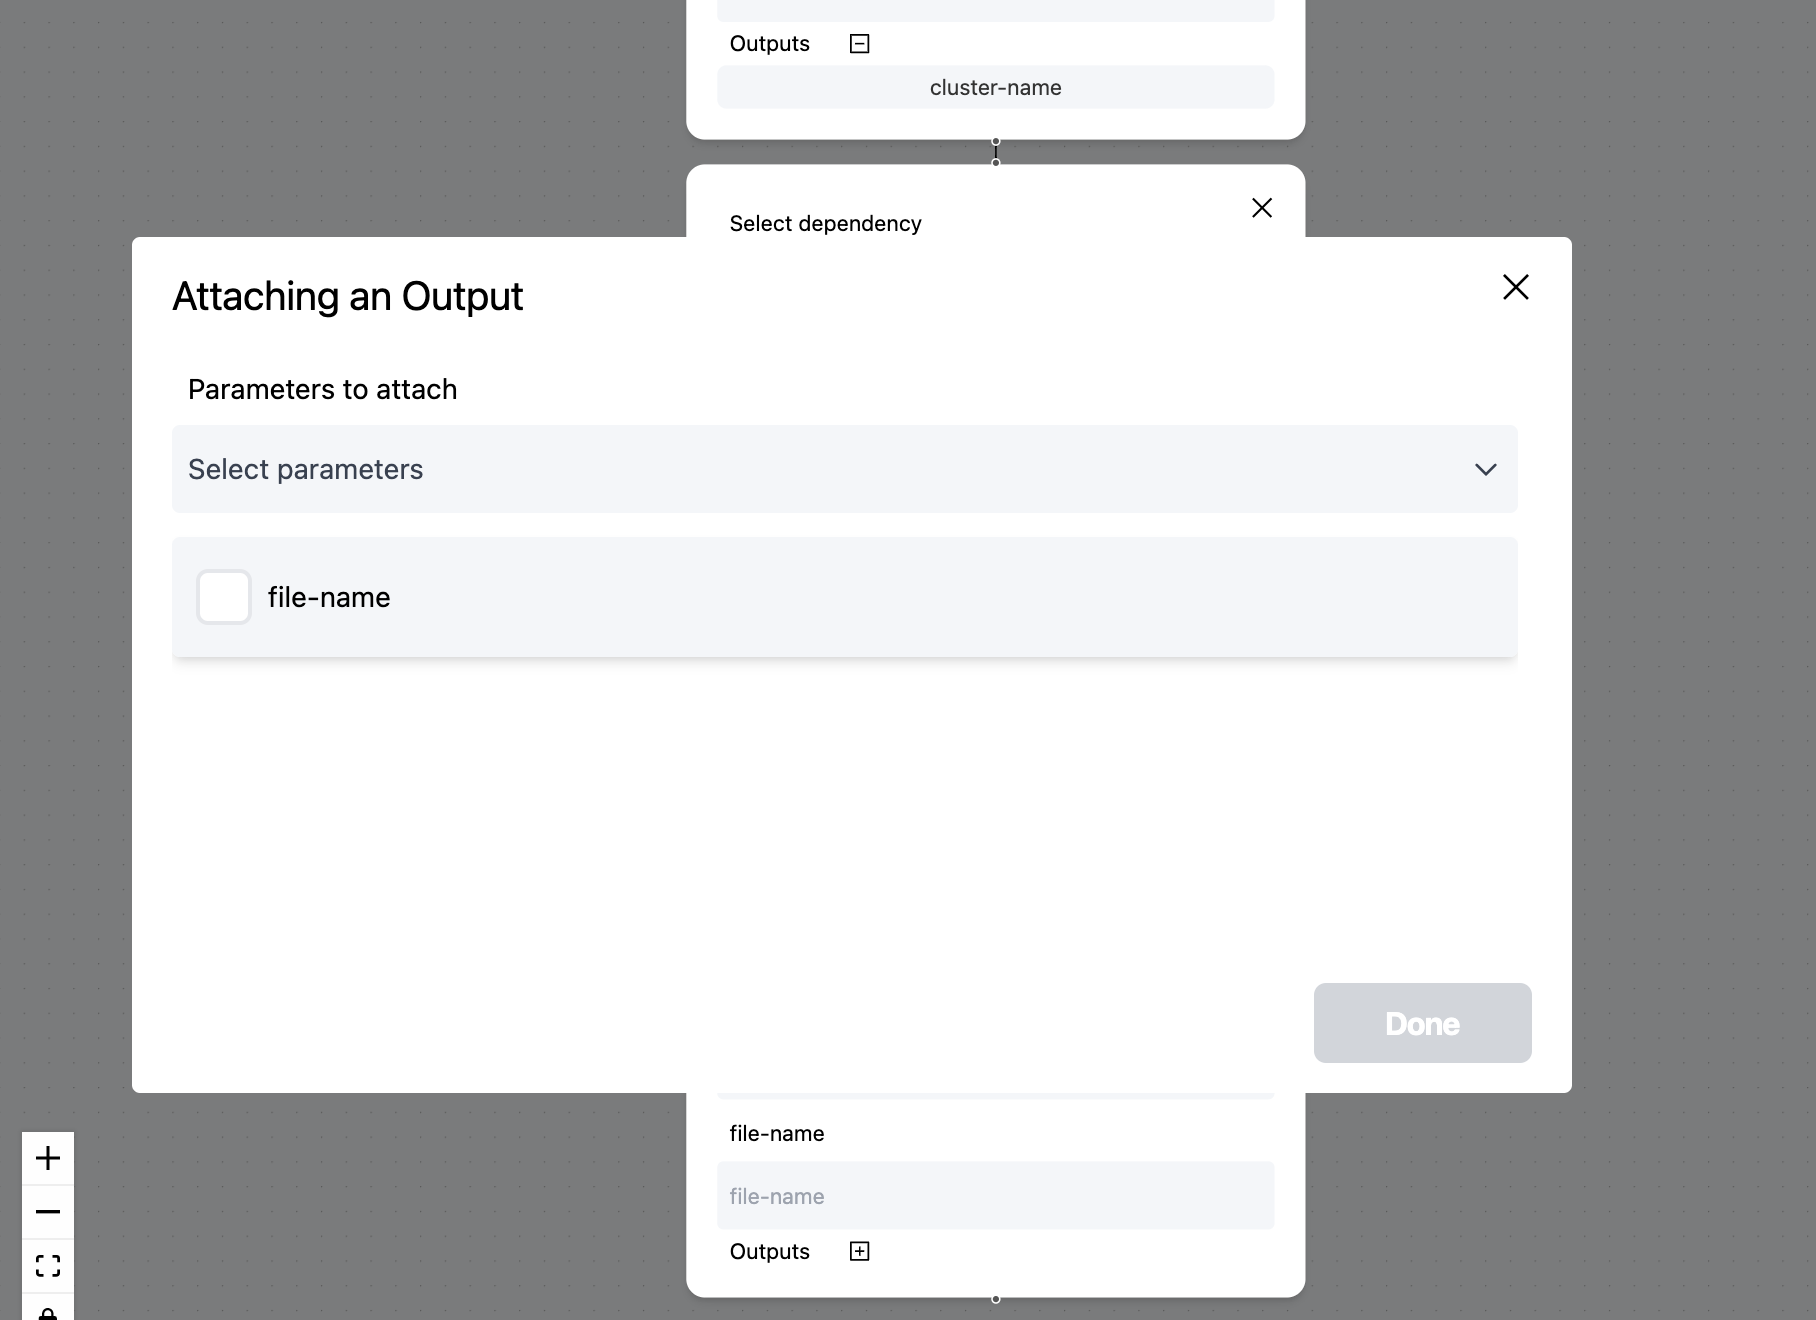
Values outputted from steps can be passed to other steps as inputs. For example, if one step outputs a string with the name of a new cluster, that value can be passed to a future step as an input.
Let's build on this example. We want to pass this new cluster name to child step that executes after the previous step. In the Inputs section in the child step, we can select the Use previous step outputs as inputs dropdown and select one of the outputs from the previous step. The format is {{tasks.<STEP_NAME>.outputs.parameters.<OUTPUT_VARIABLE_NAME>}}. Selecting an output will create a pop-up where users can select what input they would like to pass the variable to.
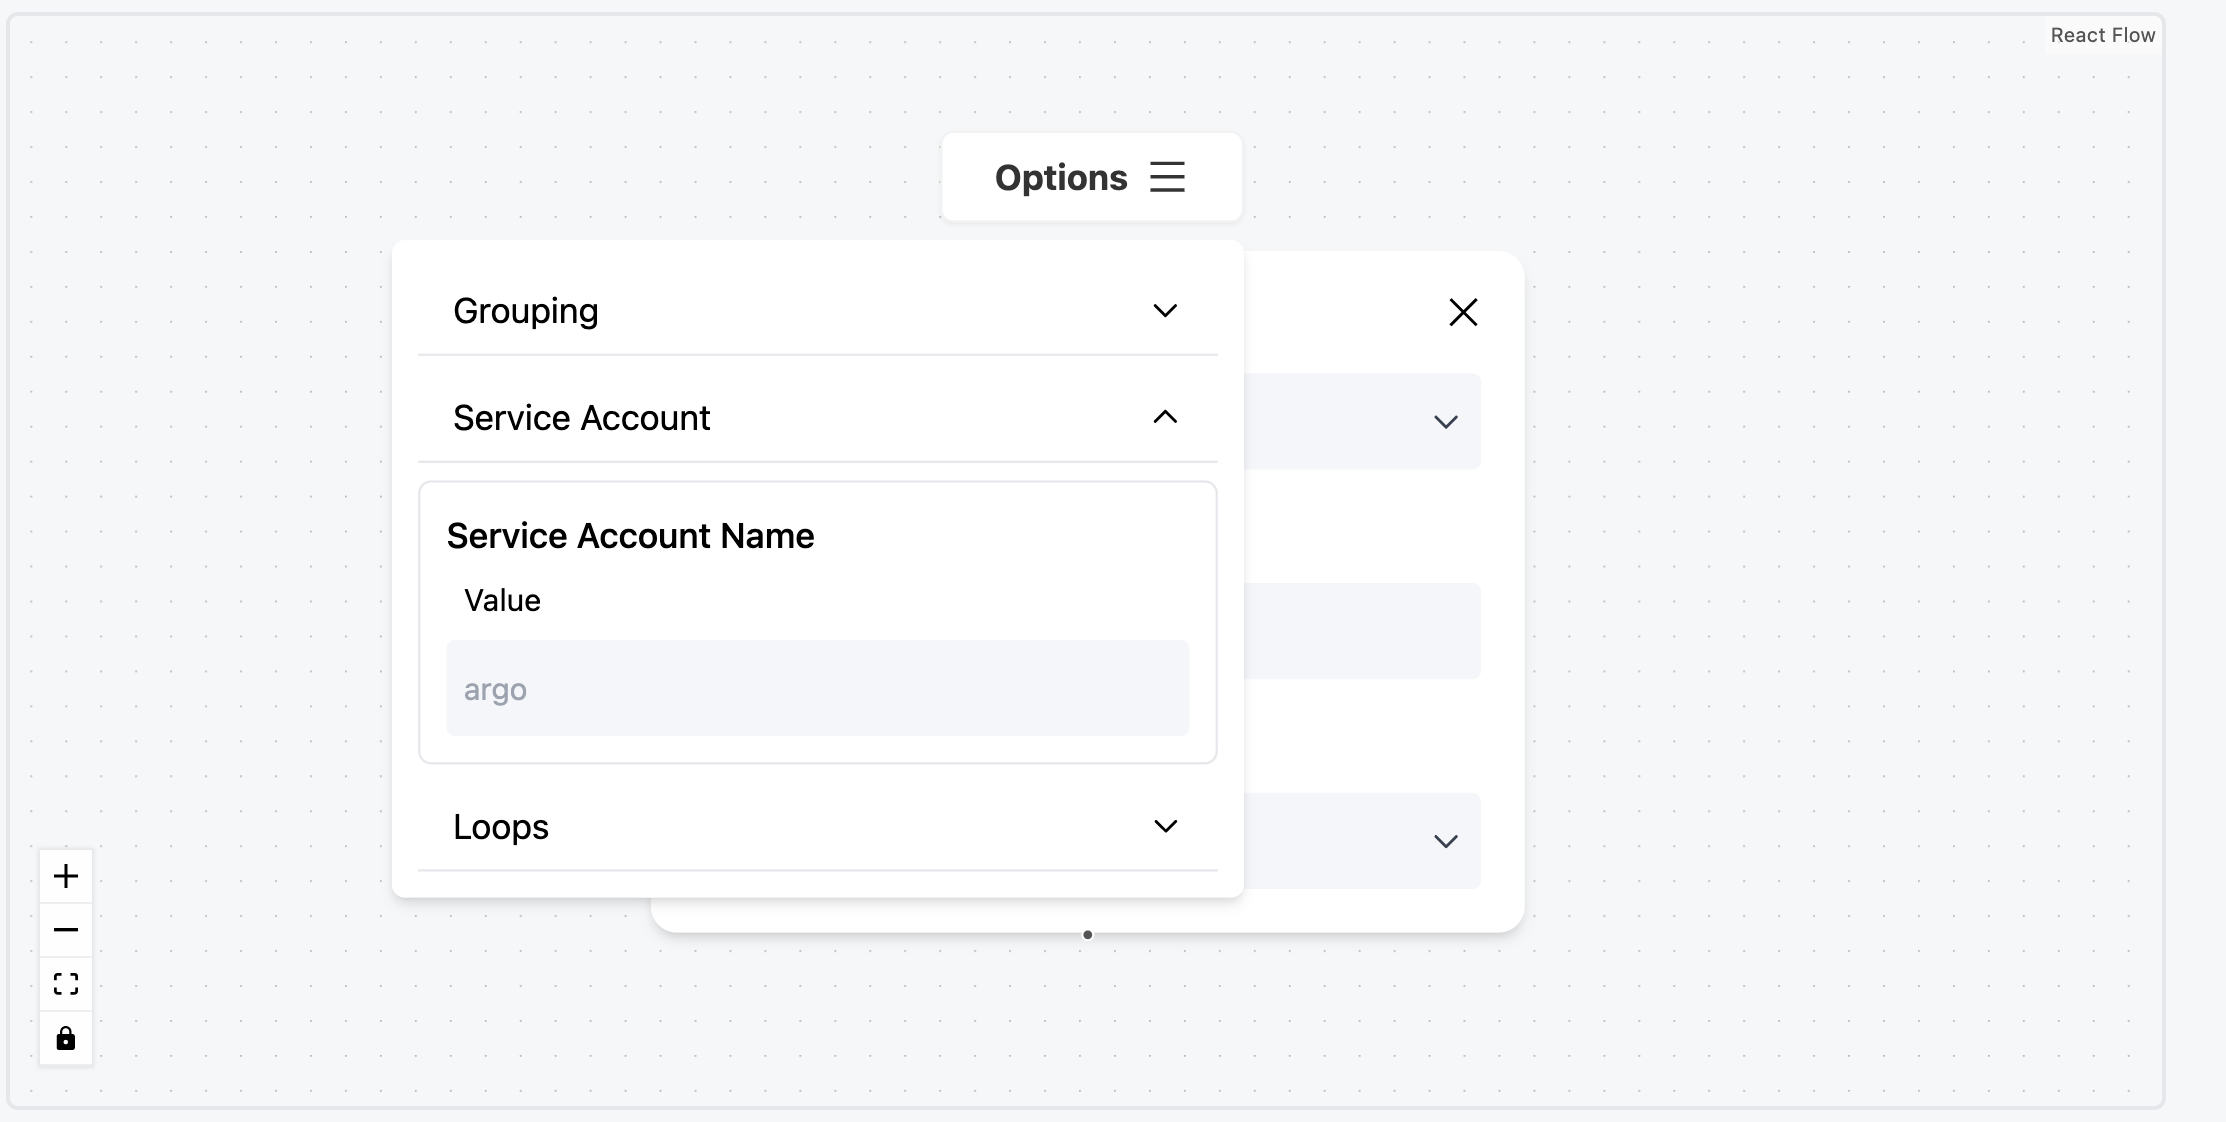
Using Service Accounts
Note: This is for more advanced workflows.
Say you want a workflow to create a DNS, or provision some resource in a cloud provider. One option would be to enter tokens or access roles as Kubernetes secrets to a step in a workflow. Another common approach is using Workload Identity (Google) or AWS Identity (Amazon).
When using Workload Identity or AWS Identity, Kubernetes service accounts are created that link back to GCP service accounts or AWS IAM policies. You can assign these Kubernetes service accounts to workflows during execution to access cloud APIs without tokens.
In the Options button for a workflow, select Service Account and enter the Kubernetes service account you would like to use. This service account should be in the greenops namespace.
Exporting the Manifests
As specified in the configuration description, pipelines are comprised of 2 files in a folder - params.yaml and pipeline.yaml. On the top left of the screen, users can press the params.yaml and pipeline.yaml buttons to view the generated manifests. The files should be copied to a folder in an upstream Git repository.
Registering a Pipeline
Similarly to templates, pipelines are stored in Git repos but pushed/pulled directly from GreenOps. Press the Create button in the top right corner of the screen.
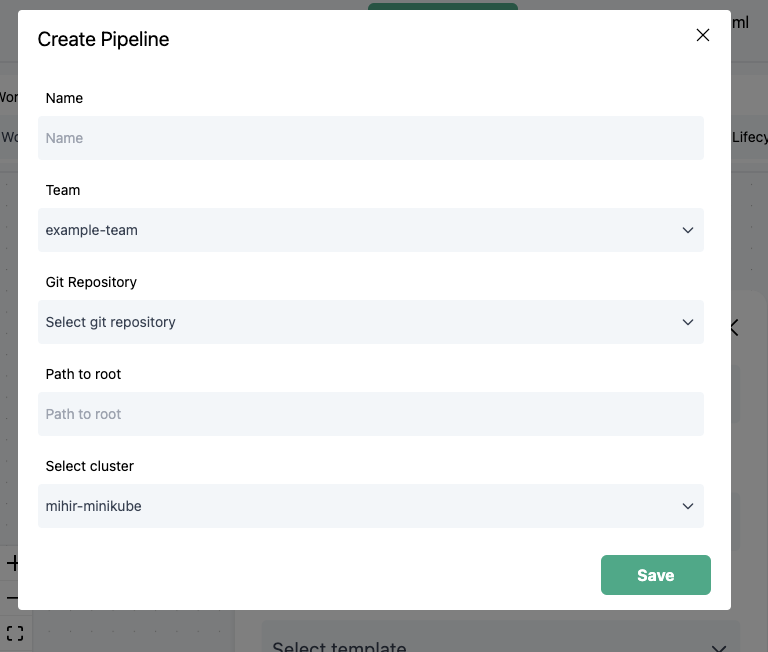
Here is a quick explanation of each of the parameters:
- Name: Name of the pipeline.
- Team: In GreenOps pipelines are grouped under teams, which in turn are all grouped under the org umbrella.
- Git Repo: Select one of the linked repositories.
- Path to Root: Specify the folder path that you want to hold the pipeline manifests. If the desired location is the repository root, simply enter
/. - Select Cluster: This section specifies which cluster the pipeline should be run on. In most cases, it is wherever the control GreenOps plane is located.
Press the save button once everything is filled out. You should see something like this:
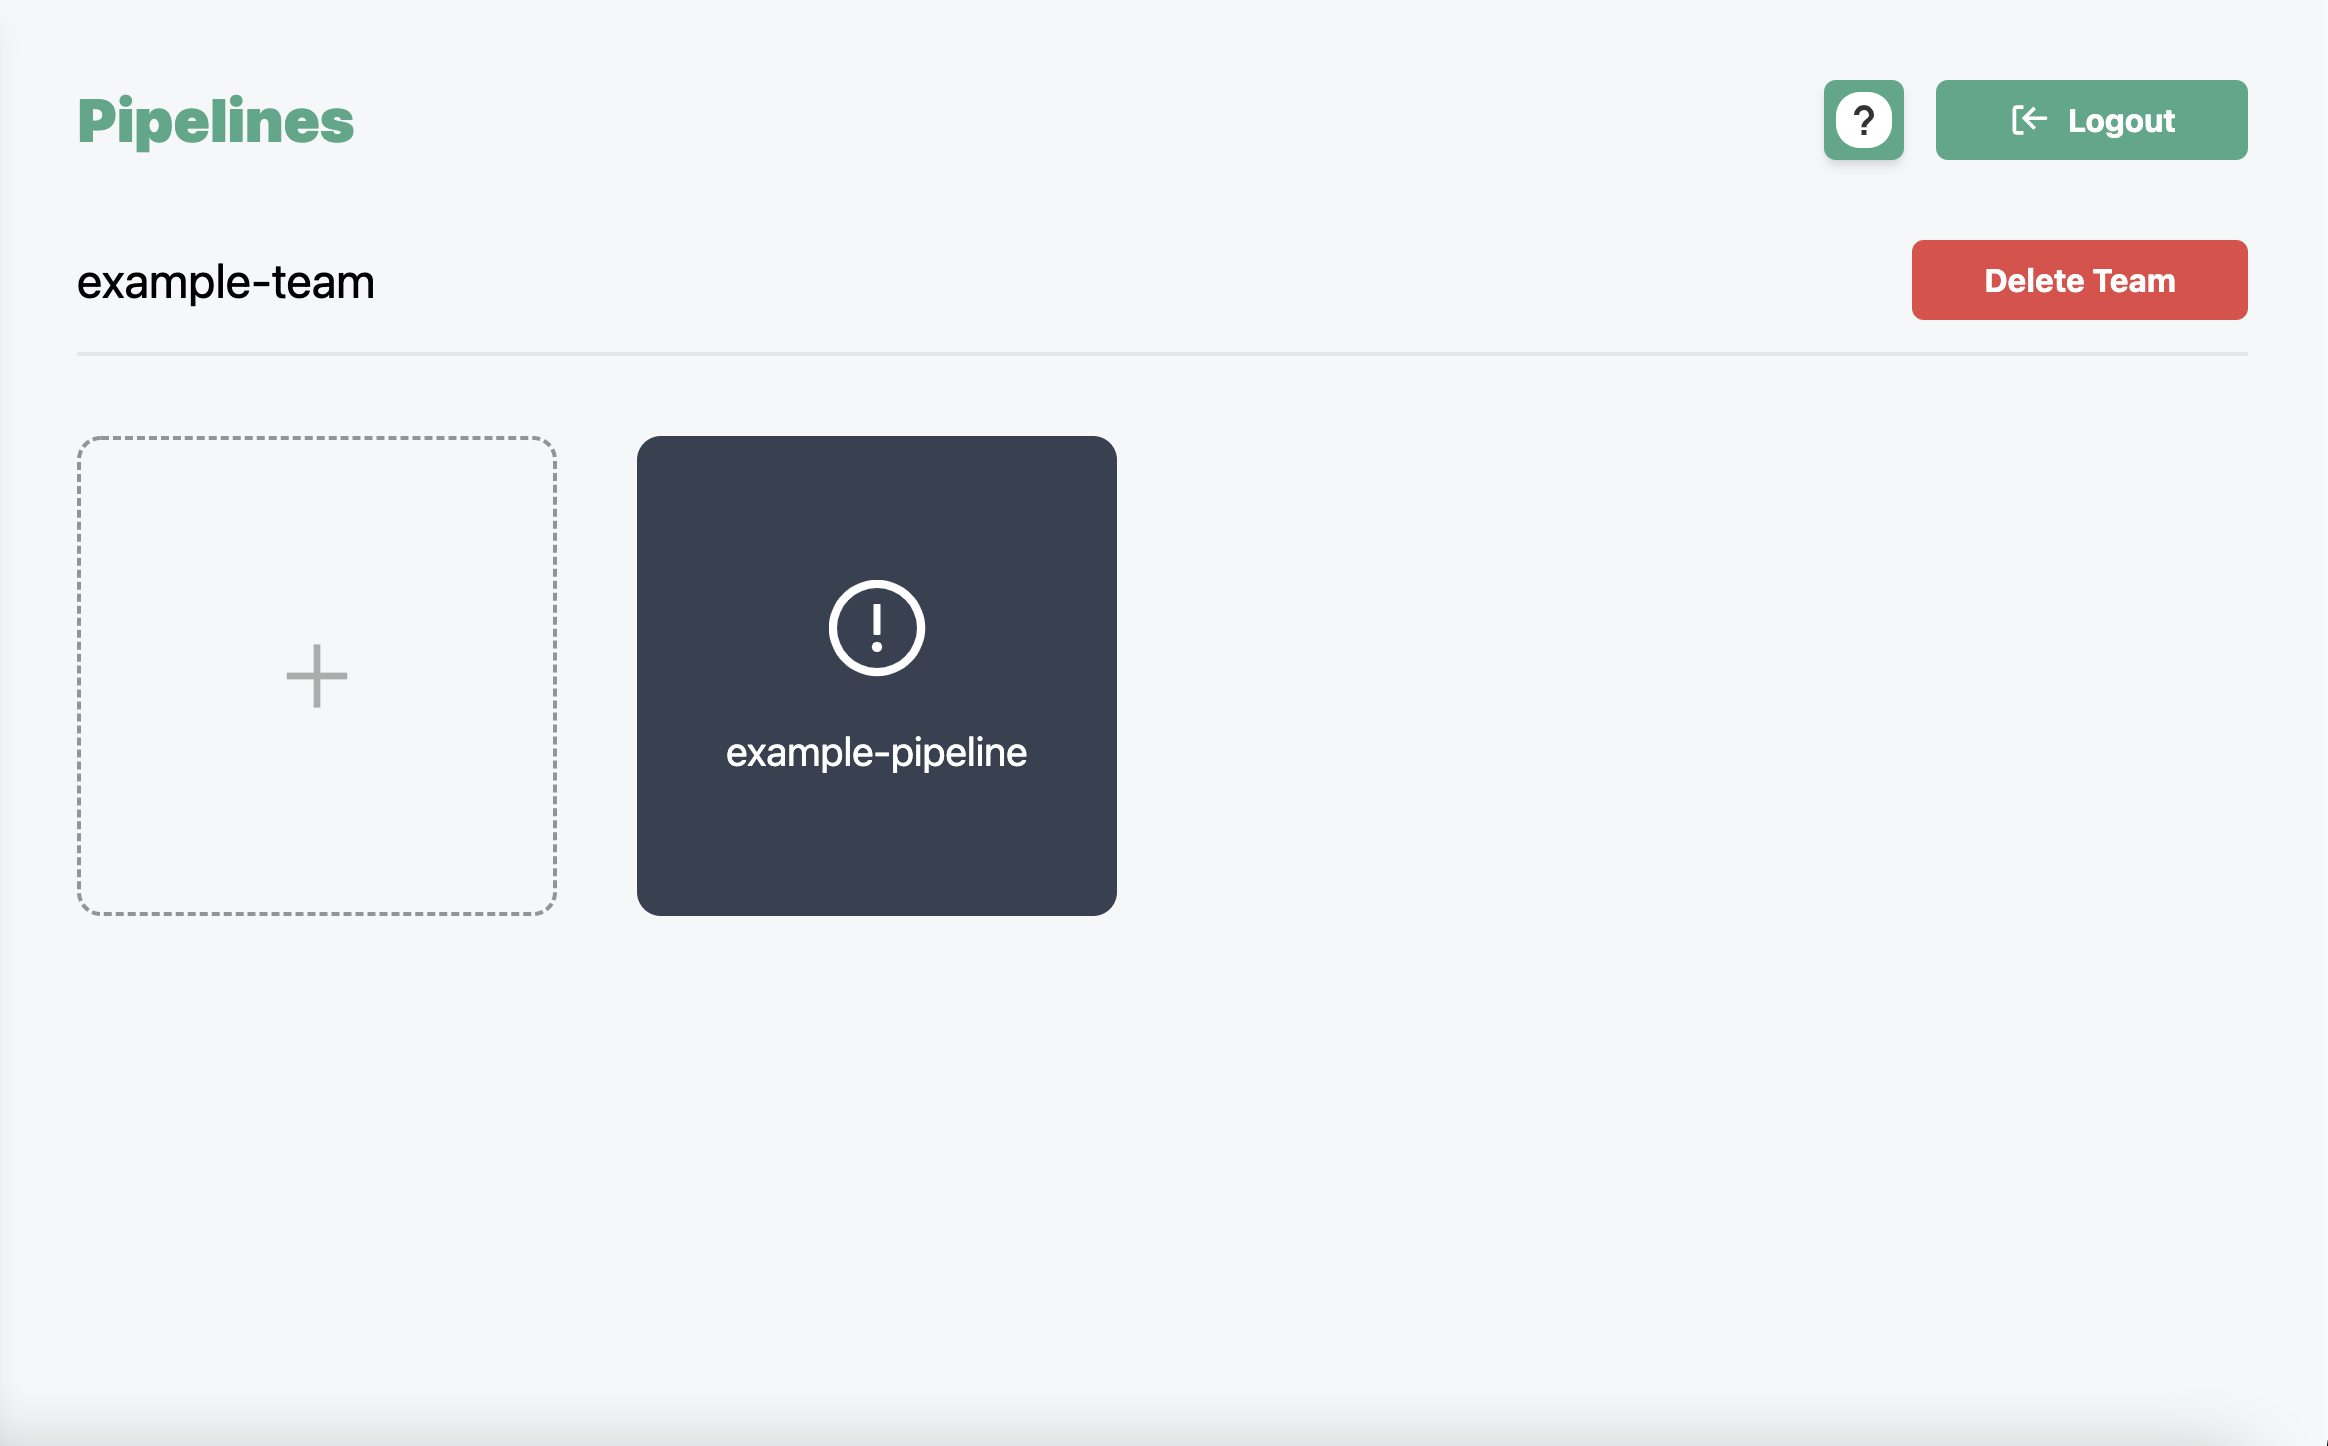
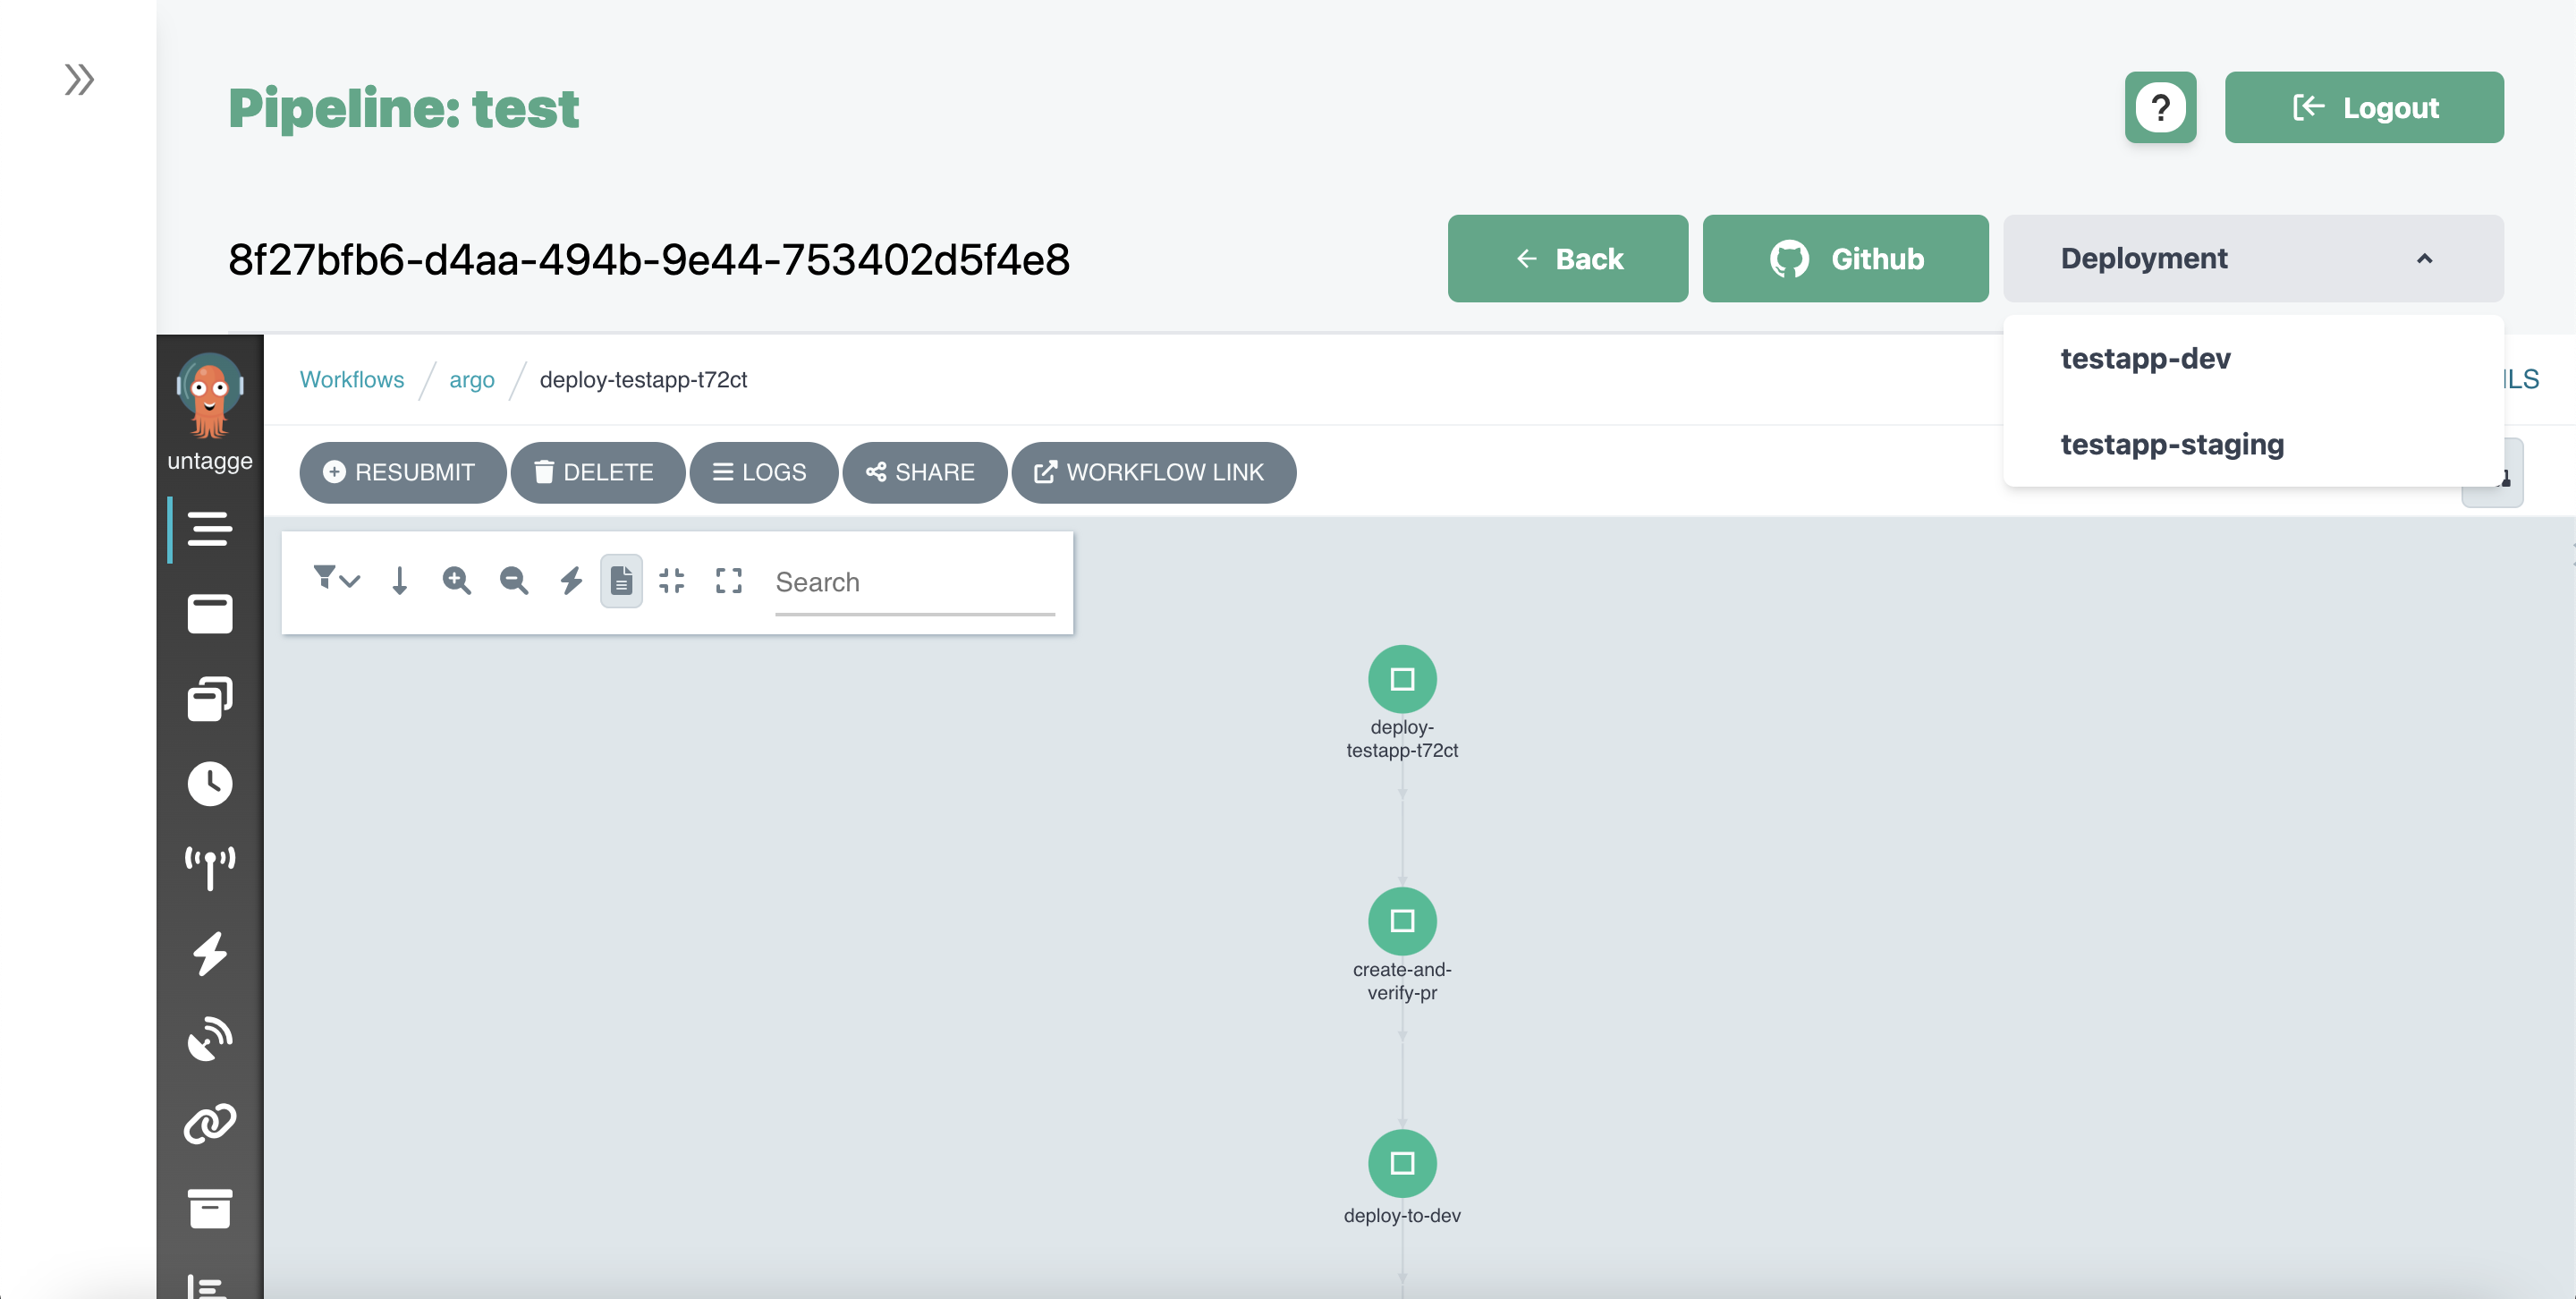
Running a Pipeline
In the Teams page, select your team. Then select the pipeline that was just created. Click the run button to execute the pipeline.
The pipeline can also be remotely triggered as a part of a Git provider's trigger (Gitlab trigger, Github action).
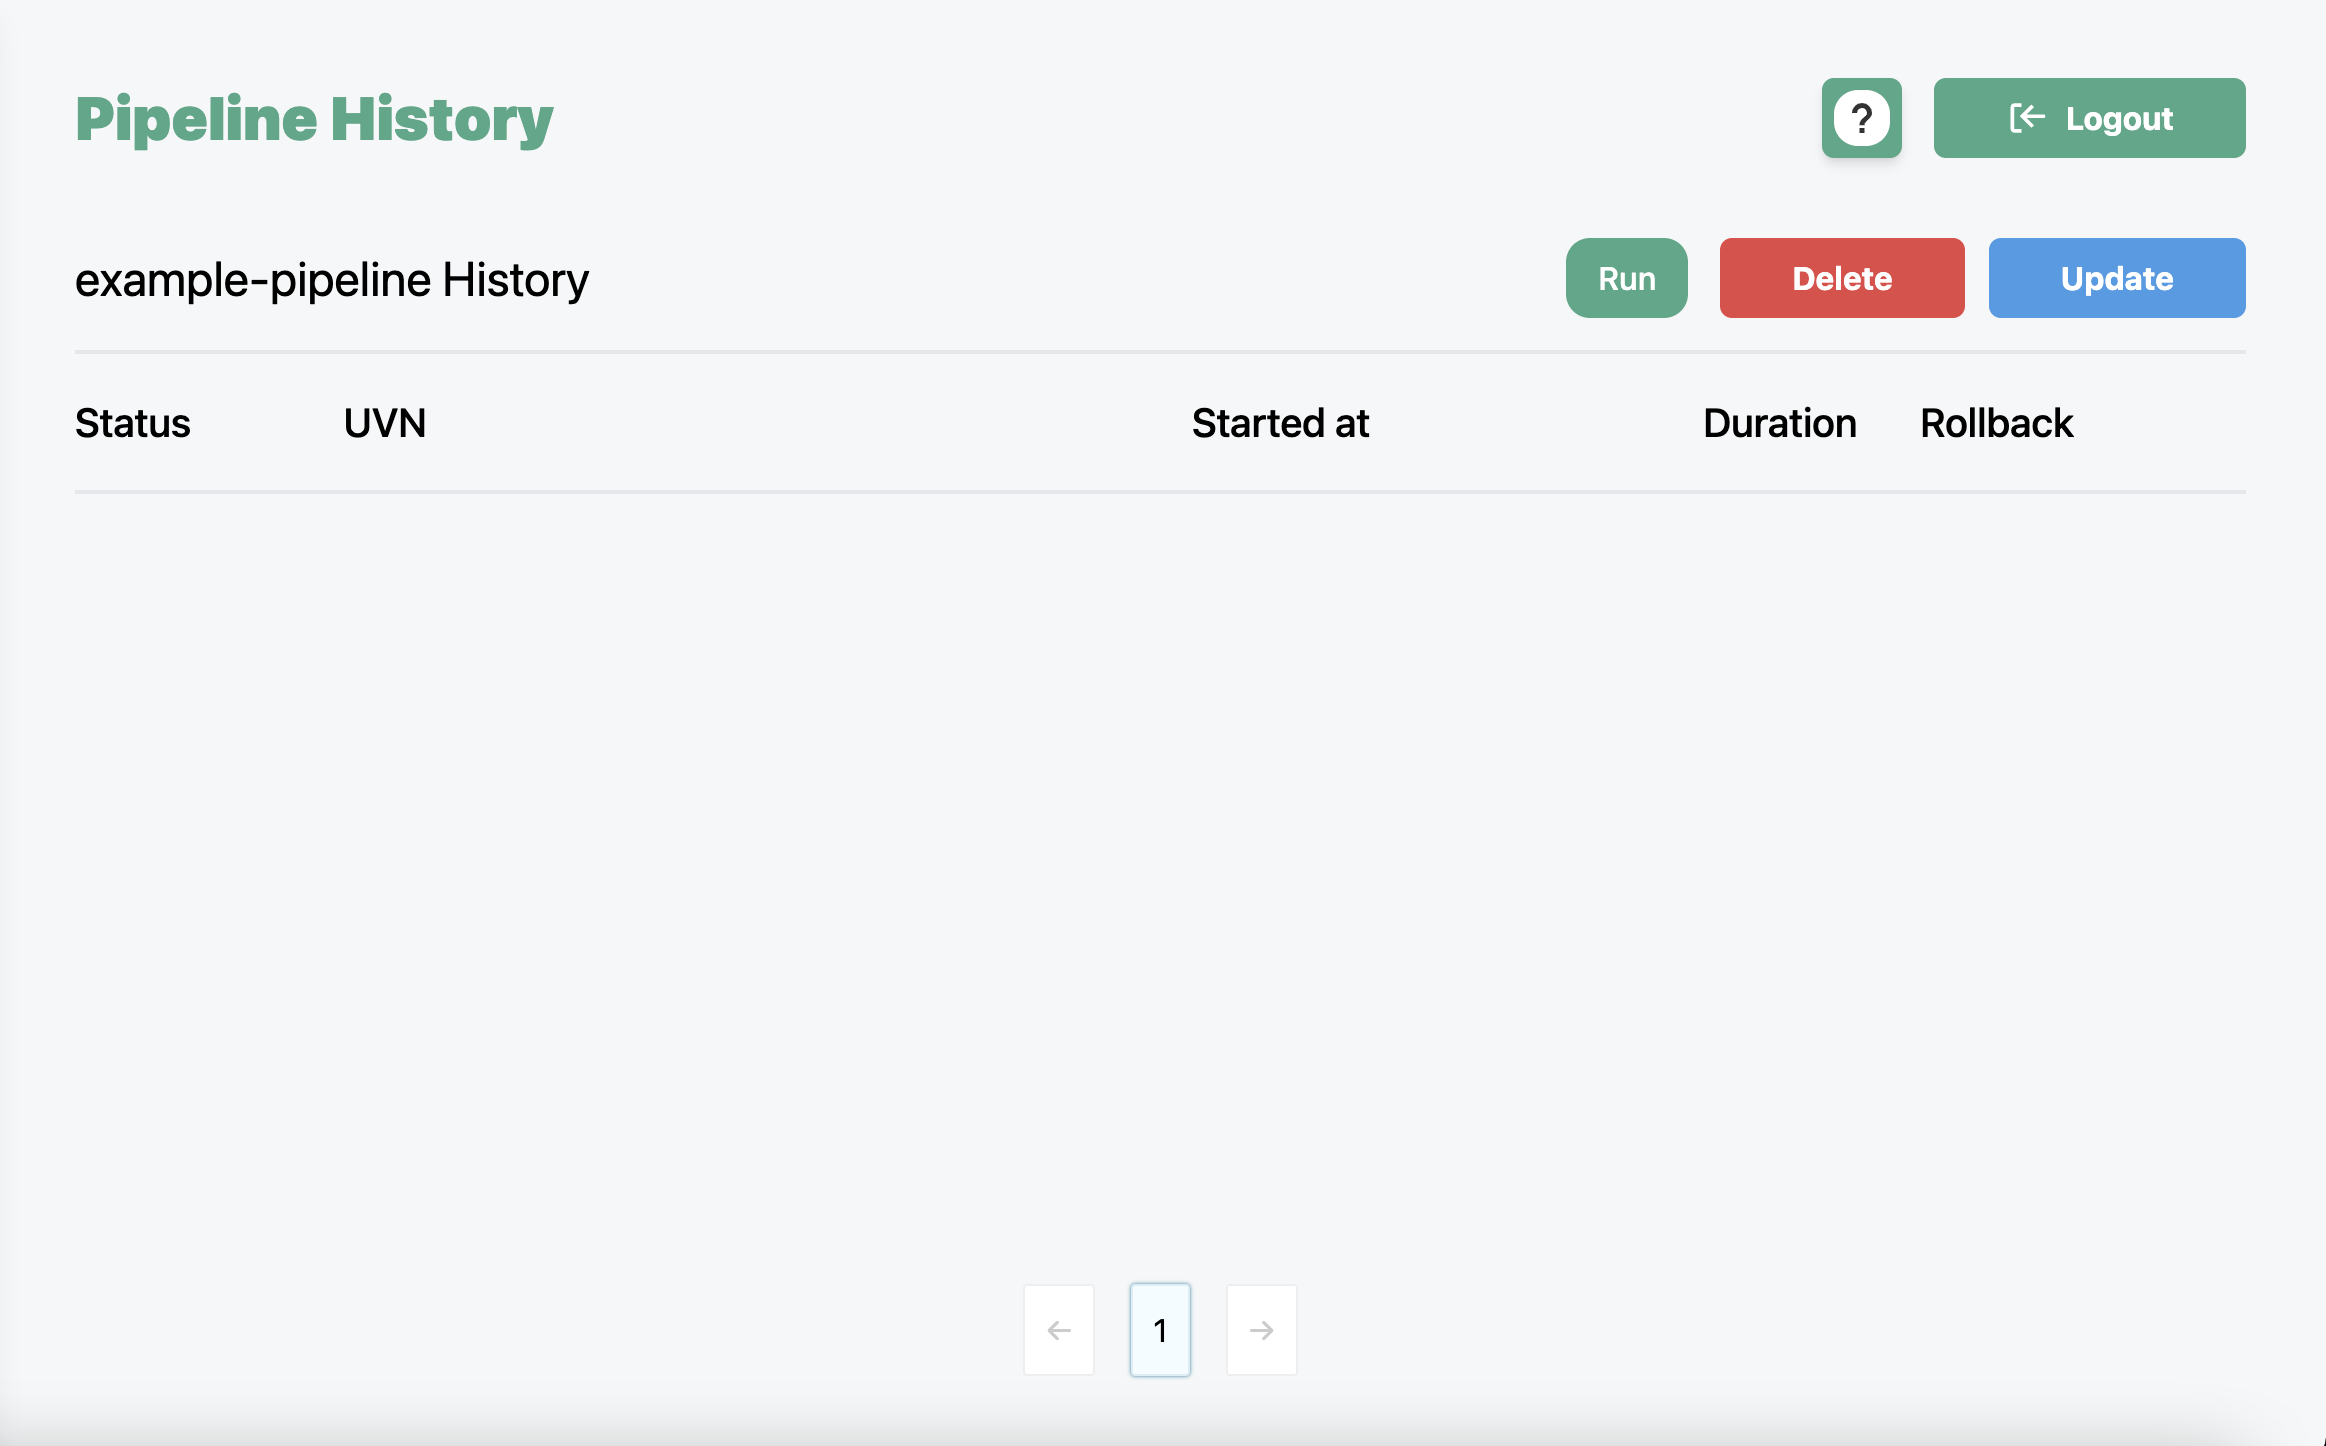
When the pipeline is triggered, a new entry should appear on the history page. If the new entry is clicked, it will show a real time view of the progressing pipeline.
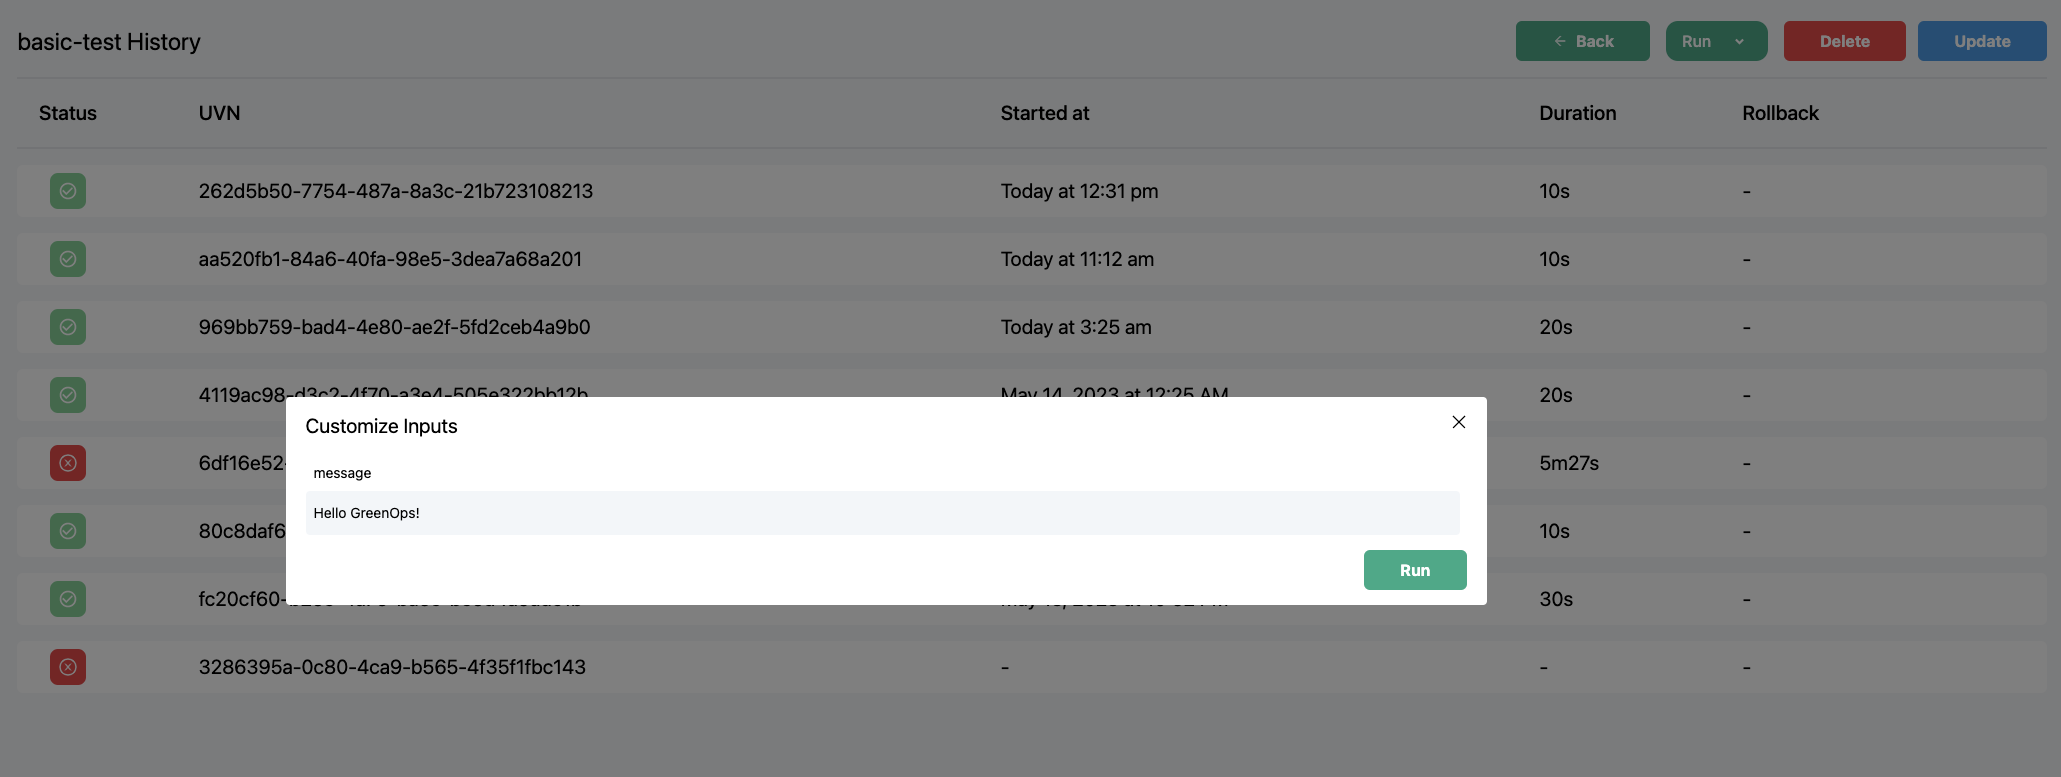
Customizing Inputs
Users can press the dropdown button next to the Run button, and select Customize Inputs. Users can hot-swap inputs and override default values in for a specific run of a workflow.
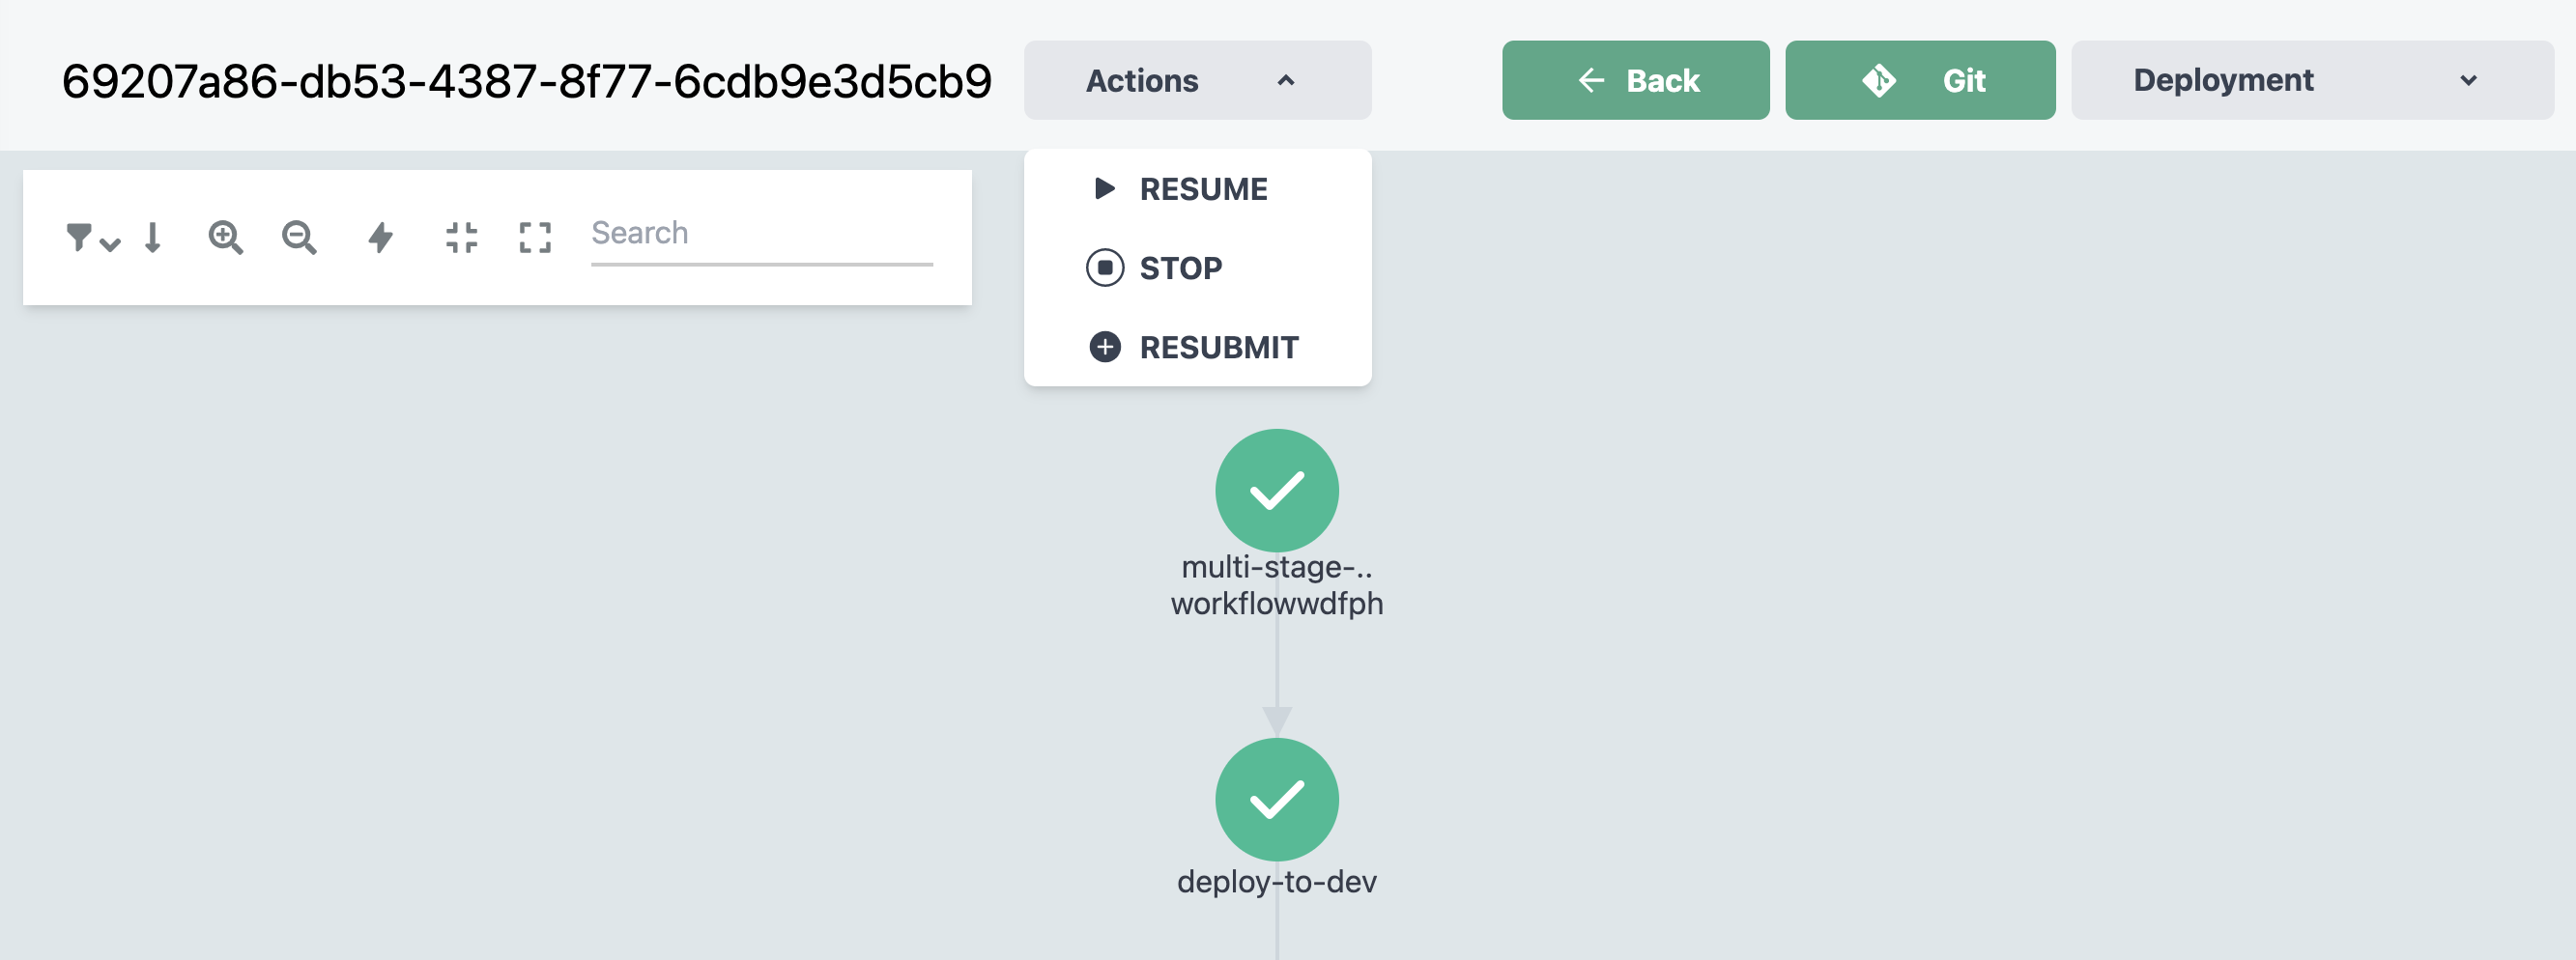
Resubmitting Workflows
If there is a workflow with customized inputs, it can be frustrating to re-enter the custom inputs for every run. The re-submit button on allows users to automatically duplicate the pipeline run with the same inputs. Trigger a re-submission using the Actions > Re-Submit dropdown in the pipeline details page.
Automated Triggers
Automated triggers are also supported. Users can create a developer API key in Settings and use it to trigger a pipeline automatically (as a part of a Github Action, Gitlab pipeline, etc). The API key is created in the Settings -> Developer section.
Call the pipeline trigger endpoint POST https://{GREENOPS_URL}/api/sync/org/{TEAM_NAME}/{WORKFLOW_NAME}/ROOT_COMMIT with the header x-api-key: {API_KEY}.
If you would like to customize the parameter values, add a JSON map in the payload with a key value pair for each variable you would like to override.
For example:
{
  key1: "value1",
  key2: "value2",
  ...
}
Updating a Pipeline
Updating Manifests
If the pipeline manifests (or something inside the Git repository is being updated), no updates have to be made to the pipeline. GreenOps will automatically pick up changes and execute accordingly during the next run.
Updating Repo URL
If the pipeline needs to be pointed to a different upstream Git repository or credentials need to be changed, press the update button in the top right corner of the pipeline page and the corresponding values can be updated.
Runtime Block
When a pipeline is running, the pipeline update and delete buttons cannot be used.